 English
 中文简体
中文简体
 русский

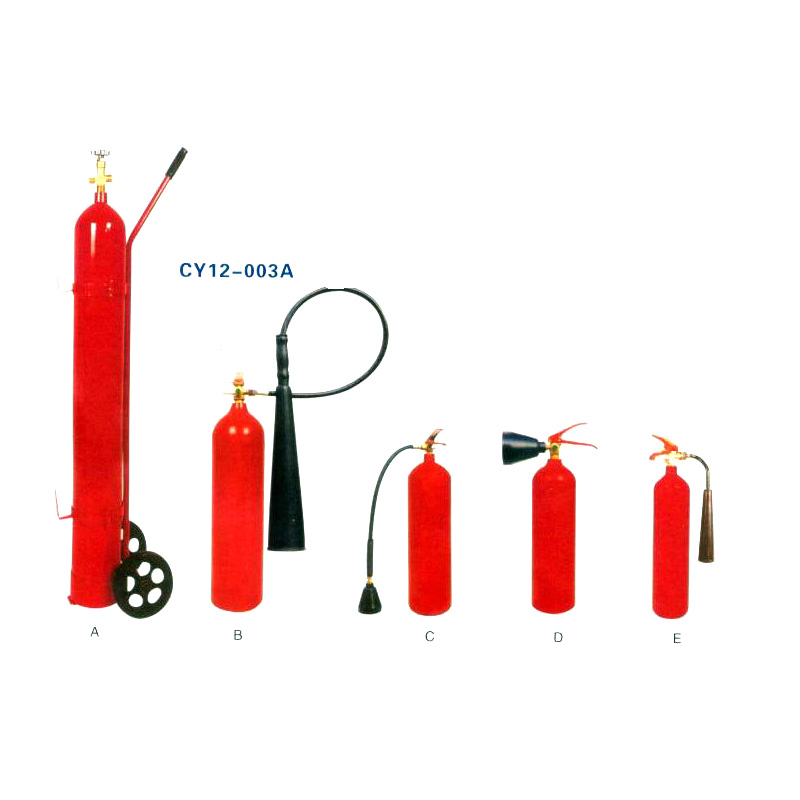
Inlet Thread: M30x1.5
Outlet Thread: G1/8x28
Gauge Connection Thread: M10x1x12.5
Dip Tube Thread: M16x1.5
Pressure Mpa: 2.3-2.8
Check Valve: Valve core
Fire quick connectors are key accessories for quick connection of fire hoses, fire hydrants, water guns and other components in fire fighting equipment. Mastering the correct operation steps and precautions of fire quick connectors can greatly improve the efficiency of fire fighting in emergency situations.
1. Types and usage of fire quick connectors
(1). Tooth buckle type quick connector (most common)
Applicable scenarios: connection of fire hoses with fire hydrants, water guns, water distributors and other equipment.
Operation steps: Check the connector to ensure that the male and female connectors are not deformed and the sealing ring is intact. Align the male connector (protruding part) with the notch of the female connector (grooved part). Insert vertically to ensure full insertion.
Rotation lock: Rotate clockwise about 30°~45°. A "click" sound indicates that the lock is successful.
Test the sealing: Slowly open the water source and check for leaks. If there is a leak, retighten or replace the sealing ring.
Separation operation: After extinguishing the fire, first turn off the water source to release the pressure. Rotate counterclockwise to the notch position and pull out vertically.
(2). Snap-on quick connector (no need to rotate)
Applicable scenarios: some new fire trucks, mobile fire fighting equipment.
Operation steps: align the male and female connectors and push them in with force. The internal spring clip automatically fixes without rotation.
Separation operation: press the release button on the side of the connector and pull it out directly.
(3). Flange quick connector (for fixed pipes)
Applicable scenarios: fire pumps, fixed fire pipe connections.
Operation steps: align the flange plates to ensure that the bolt holes of the two flanges are aligned. Insert the bolts and tighten the nuts crosswise (to avoid leakage caused by unilateral force).
Test water pressure: slowly increase pressure and check for leakage.
2. Practical steps for connecting fire hoses (taking fire hydrants as an example)
Preparation: Check whether the hose, connectors, and fire hydrants are intact. Make sure the fire hydrant valve is closed to prevent the hose from swinging and injuring people due to accidental opening. Connect the hose to the fire hydrant
One person fixes the fire hydrant interface, and the other person inserts the male connector of the hose into the female connector of the fire hydrant and rotates to lock. Straighten the hose, align the female connector on the other end with the male connector of the water gun, insert it and rotate it to lock. Slowly open the fire hydrant valve and check for leaks. After confirming that there are no leaks, fully open the valve and start fire extinguishing.
After extinguishing the fire: Turn off the water source to release the residual pressure in the hose. Reverse the rotation of the connector and pull it out, roll up the hose, clean it and store it.
3. Key points
(1) Operation safety
Before connecting, make sure there is no pressure in the pipe to prevent the hose from swinging and injuring people.
Two people work together to avoid the hose from twisting or the connector falling off.
(2) Maintenance
Check the connector and seal ring for aging or deformation every month.
Avoid exposure to sunlight or freezing during storage to prevent the rubber from hardening and cracking.
(3) Emergency handling
If the connector cannot be separated, tap the buckle part or apply lubricant to assist in disassembly.
If a serious leak is found, immediately turn off the water source and replace the seal ring or connector.

Inlet Thread: M30x1.5
Outlet Thread: G1/8x28
Gauge Connection Thread: M10x1x12.5
Dip Tube Thread: M16x1.5
Pressure Mpa: 2.3-2.8
Check Valve: Valve core

Inlet Thread: M30x1.5
Outlet Thread: G1/4x19
Gauge Connection Thread: NPT1/8x27
Dip Tube Thread: M16x1.5
Pressure Mpa: 2.3-2.8

Inlet Thread: M30x1.5
Outlet Thread: G1/4x19
Gauge Connection Thread: NPT1/8x27
Dip Tube Thread: M16x1.5
Pressure Mpa: 2.3-2.8

Inlet Thread: M30x1.5
Outlet Thread: M10x1
Gauge Connection Thread: NPT1/8x27
Dip Tube Thread: M16x1.5
Pressure Mpa: 2.3-2.8

Inlet Thread: M30x1.5
Outlet Thread: G1/8x28
Gauge Connection Thread: M10x1x12.5
Dip Tube Thread: M16x1.5

Hanging Dry Powder Fire Extiguisher

Inlet Thread: M30x1.5
Outlet Thread: G1/8x28
Gauge Connection Thread: M10x1x12.5
Dip Tube Thread: M16x1.5
inquiry
Can Supply Mature And
Stable Products.
Contact Us
Phone: +86-575-82411708
E-mail: sale@newideafire.com
Address: WUFU INDUSTRIAL ZONE, ZHEJIANG,CHINA
Products
Get In Touch

 浙公网安备 33060402001388号


